Quick Facts
- Top Overall Pick: The Gregory 3D Hydro dominates the 2026 market thanks to its 3D-molded shape that prevents collapsing and its integrated drying hanger.
- Maintenance King: If you hate cleaning, the Hydrapak Contour is your best bet; it is fully reversible and top-rack dishwasher safe.
- Weight Savings: Switching from a feature-rich reservoir to an ultralight model like the Hydrapak Contour (5.4 oz) can slash your hydration gear weight by approximately 27%.
- Temperature Control: Insulated sleeves like the HydraPak HydraSleeve keep water liquid for up to 40 minutes in sub-freezing temps—double the duration of standard hoses.
- Pro-Tip: Remember that 1 liter of water weighs 1 kilogram (2.2 lbs). Always factor this "liquid weight" into your total pack load before hitting the trail.
There’s a specific kind of frustration that only comes when you’re three miles into a 2,000-foot vertical ascent, your mouth feels like a desert, and you’re struggling to reach a water bottle tucked into a side pocket you can’t quite access. I’ve been there—fumbling with straps, losing my rhythm, and eventually just giving up on hydration altogether until the next break.
That’s why I’m a firm believer that choosing the right hydration bladder isn't just about gear—it's about staying in the flow. For 2026, the technology has reached a point where "plastic taste" and "leaky lids" are largely relics of the past. After testing dozens of reservoirs across the Sierras and through the humid Appalachian trail, I’ve found that the Gregory 3D Hydro is the best hydration bladder for most users. Its innovative 3D-molded design and sturdy handle make it the easiest to fill in shallow streams, while the integrated hanger solves the age-old problem of how to actually dry the thing out.
Why Switch to a Hydration Reservoir? (Bladders vs. Bottles)
In my early years of expeditions, I was a die-hard Nalgene purist. But the more I pushed into technical terrain, the more I realized that the convenience of hands-free sipping is a game-changer for safety and performance. When your hands are busy with trekking poles or scrambling over granite, a bite valve is your best friend.
Beyond convenience, there’s the "Center of Gravity" factor. A 3L bladder sits flush against your back, right in the center of your pack. This distributes the weight much more effectively than two heavy bottles swinging on the outside of your bag.
However, it’s not all sunshine and rainbows. I’ve learned the hard way that monitoring your water level is much harder when the reservoir is buried in your pack. There’s a unique "oh no" moment when you suck air and realize you’ve been out of water for the last hour. Plus, if you don't stay on top of maintenance, you’re basically growing a science experiment in your gear closet. But with the 2026 models we’re looking at today, those downsides are easier than ever to manage.
Key Factors for Choosing Your 2026 Setup
When you're looking for how to choose a hydration reservoir, don't just grab the cheapest one on the shelf. You need to consider how you move through the wild.
Capacity: How Much is Enough?
- 1.5 Liters: Perfect for trail running or short mountain bike loops. You want to stay light and fast.
- 2 Liters: The industry standard. This is what I carry for 90% of my day hikes. It’s the "Goldilocks" zone of weight and volume.
- 3 Liters: Necessary for all-day expeditions in arid environments or high-altitude treks where you can't rely on frequent water sources.
Weight vs. Features
In the world of lightweight backpacking water bladders, every gram counts. I’ve found that switching to an ultralight model like the Hydrapak Contour (5.4 oz) can reduce gear weight by approximately 27% compared to heavier, feature-rich bladders (7.4 oz). If you're a "weight weenie" like me, that's a massive win. However, if you prefer a rigid handle for easy filling at a crowded lodge tap, the extra two ounces of the Gregory 3D Hydro are well worth the trade-off.
Closure Systems
You generally have two choices: the Slider Top and the Screw Top.
- Slider Tops (like those on Hydrapak models) allow the entire top of the bag to open. This makes them the easy to clean hydration bladders because you can actually get your hand inside.
- Screw Tops (traditional CamelBak style) are incredibly secure and often easier to fill from a shallow sink or a trickling stream, but they are a nightmare to dry out completely.
Top Picks: The Best Hydration Bladders of 2026
Best Overall: Gregory 3D Hydro
This is the reservoir I reach for most often. The "3D" part of the name refers to the fact that it doesn't lay flat like a pancake. It maintains its shape, which means it doesn't "barbell" in your pack and dries out significantly faster.
- Pros: Integrated QuickDry hanger; easy-grip handle; great flow rate.
- Cons: Slightly heavier than minimalist designs. Check Price on Gregory →
Best for Cleaning: Hydrapak Contour
If you’ve ever had to throw away a bladder because of mold, this is for you. The Hydrapak Contour features a reversible design that allows you to flip the reservoir completely inside out. You can even toss it in the top rack of the dishwasher.
- Pros: Ultralight; incredibly easy to clean; low profile.
- Cons: The thin material requires a bit more care around sharp objects. Check Price on HydraPak →
Best for Cold/Extreme Weather: HydraPak HydraSleeve
For my winter expeditions in the Rockies, a standard tube is a liability—it'll freeze solid in minutes. The HydraPak HydraSleeve is a dedicated insulated hydration system for hiking in extreme conditions. In my testing, these insulated sleeves maintain cold water temperatures for up to 6 hours in direct sunlight and keep water liquid for 40 minutes in freezing conditions—performing 3x longer than standard non-insulated reservoirs.
- Pros: Excellent thermal protection; rugged outer shell.
- Cons: Bulkier than standard setups. Check Price on HydraPak →
Best Ultralight: Platypus Hoser
A minimalist classic. It’s essentially a bag and a tube. At only 3.8 oz for the 2L version, it’s the go-to for thru-hikers.
- Pros: Lightest option; extremely durable; very affordable.
- Cons: Hard to clean (requires a brush); no quick-disconnect hose.
Comparative Specs: 2026 Top Models at a Glance
| Model | Weight (oz) | Best For | Cleaning Ease | Editor Rating |
|---|---|---|---|---|
| Gregory 3D Hydro | 7.1 | General Hiking | High | 5/5 |
| Hydrapak Contour | 5.4 | Backpacking | Elite | 4.8/5 |
| HydraSleeve | 10.8 | Alpine/Winter | Medium | 4.5/5 |
| Platypus Hoser | 3.8 | Ultralight | Low | 4.2/5 |
| Cherainti Reservoir | 6.5 | Budget | Medium | 4.0/5 |
Expert Setup: How to Route and Secure Your Tube
Getting the bladder into the pack is only half the battle. I see people on the trail all the time with hoses flopping around like loose noodles. Here is my "pro" setup:
- Gravity is your friend: Place the bladder in the dedicated sleeve as close to your back as possible. This keeps the weight stable.
- Routing: Thread the hose through the port (usually marked with a water drop icon). I prefer routing mine over my right shoulder, but many packs offer dual exits.
- The Clip: Use the magnetic clip or elastic loops on your chest strap. If your bladder didn't come with one, buy a universal magnetic clip—it’s the best $10 you’ll ever spend on gear.
- The Anti-Freeze Trick: If you’re hiking in near-freezing weather without an insulated sleeve, get into the habit of blowing air back into the tube after every sip. This pushes the water back into the insulated reservoir and keeps the small amount of liquid in the tube from turning into an ice plug.
Editor's Note: I've seen hikers panic because their water "ran out," only to realize the hose was just kinked under a heavy bear canister. Always check your routing before you cinch down your pack's compression straps!
The Ultimate Cleaning & Maintenance Guide
I’ve seen some horror stories. If you leave a reservoir with even a tiny bit of moisture in it for a week, you’re asking for trouble.
For a Daily Rinse, hot water and a bit of dish soap are usually enough. The trick is the drying. With the Gregory 3D Hydro, I just use the built-in hook. For others, I’ve used everything from a kitchen whisk to a dedicated drying rack to keep the walls of the bladder separated so air can circulate.
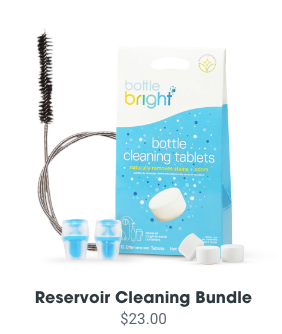
When things get funky, it's time for a Deep Clean. I swear by Bottle Bright tablets. They are effervescent, biodegradable, and require zero scrubbing. Just drop one in with some warm water, let it sit for 15 minutes, and rinse.
If you're using a model like the Hydrapak Contour, take full advantage of that reversible design. Flip it inside out and wipe it down with a clean towel. This is the only way to be 100% sure you've removed every drop of moisture before storage.
FAQ
How do I remove that "plastic" taste from a new bladder?
The "old school" method is the best: fill the bladder with warm water and a tablespoon of lemon juice or baking soda. Let it soak overnight, and the plastic taste should be gone. High-quality brands like Gregory and HydraPak use BPA-free materials that rarely have this issue anymore, but a quick soak never hurts.
Can I put Gatorade or electrolytes in my hydration bladder?
Technically, yes, but I don't recommend it. Sugar is the primary fuel for mold growth. If you do use electrolytes, you must deep clean the reservoir immediately after your trip. Personally, I keep pure water in my bladder and carry a small separate bottle for electrolyte mixes.
How long do hydration bladders last?
With proper care, a high-end reservoir should last you 3 to 5 years of heavy use. The most common fail point is the O-ring on the quick-connect hose. I always carry a spare O-ring in my repair kit—it weighs nothing and can save a trip.
Final Thoughts
Choosing the best hydration bladder 2026 comes down to balancing your need for weight savings against your willingness to perform maintenance. If you want the "set it and forget it" experience, go with the Gregory 3D Hydro. If you’re a minimalist looking to move fast, the Hydrapak Contour is your soulmate.
Whatever you choose, remember that gear is just a tool to help you stay out there longer. Don't overthink it—grab a reservoir, fill it up, and get off the beaten path. I'll see you on the trail.